
(Alki Beach, West Seattle)
The autumnal equinox was tonight, and as all knitters know, that means knitting season is officially open. For most of us, this means we crack down and get to work on knitting gifts for our friends and family the upcoming holidays, and if we're lucky, we'll knit one or two things for ourselves in the process. I have been daydreaming about knitting myself a Scandinavian-inspired sweater for ages now, stranded colorwork and all, so with fall rapidly approaching (and Christmas-gift-knitting around the corner), I finally decided to sit down and make myself the Scandinavian sweater I've been wanting to for years. Enter Skydottir: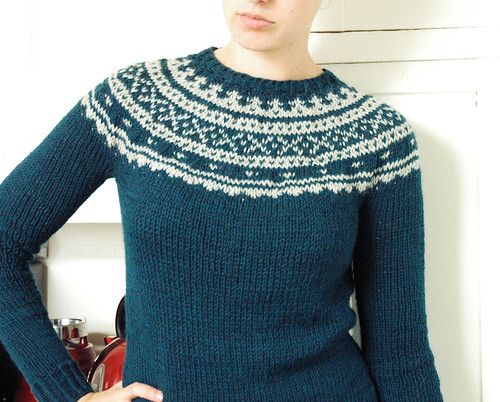
I knit this sweater without a pattern, which is a first for me, and so the bulk of this post is going to contain notes on how I decided to do what I did and what I learned about garment construction and designing knitwear. If that doesn't sound remotely interesting, feel free to skip the writing and just look at the pictures!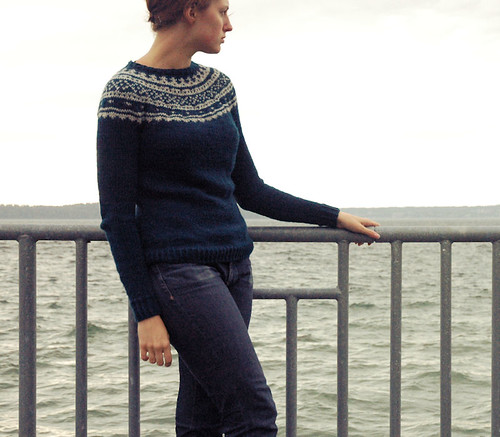
Going in, I had an idea in my head of what I wanted, but I couldn't find the right pattern. I knew I wanted a pullover with a seamless yoke construction - no steeking, no seaming, but with a yoke worked in stranded colorwork. I scoured ravelry, I checked out books and websites, but I couldn't find what I was looking for. I am notoriously stubborn, so I decided to combine my Scandinavian sweater project with the challenge of working up a wearable garment without using a pattern. Not only would I end up with the sweater I had envisioned, but it would be a valuable learning experience in the process. Feeding two birds with one seed, right?
Prior to Skydottir, I had knit two pullovers (one raglan knit flat and seamed, one bottom-up seamless yoke knit in the round), and one cropped cardigan. I knew I wanted to go with the seamless yoke construction, as the stranded yoke is the showcase of this sweater, so I took the basic principles used in that pullover pattern (which happened to be Kate Davies's Owls) and applied them to this project, which uses a different needle size and a different yarn weight. These techniques were:
- bottom-up construction, knitting first body, then sleeves, then joining all three to knit the yoke up to the neckband
- decreases and increases for waist shaping on the body
I also knew I wanted to do a 1x1 twisted rib at the waistband, neckband and cuffs of the sweater, because I think it's a really clean looking ribbing. So I started with the waistband, casting on for my twisted rib. And here's where I learned my first lesson, which is: SWATCH. Okay, I know, this should be a big duh. We all know the importance of swatching. But still, I thought I could get by just estimating, and somehow, I decided 80 stitches sounded right. Skydottir was worked on American size 9 needles with worsted weight yarn - I quickly discovered that 80 stitches was not going to make it around my waist. I frogged the one or two rows I had on the needles and got ready to start over. And yet I still did not swatch. On try #2 I overcompensated and cast on far too many stitches - at least 160, but I don't remember for sure. I worked up 15 rounds of twisted rib and an inch or two of stockinette before I realized my sweater was huge. I was frustrated, but I sat down and measured my gauge on my too-huge try #2 and used that to calculate how many stitches I really should be casting on by measuring my hips, subtracting two inches for negative ease, and multiplying my stitches per inch by that number. I frogged try #2, cast on for try #3, and the third time was a charm. It was smooth sailing after that.
While Owls uses a rather unique pattern of decreases and increases along the back of the sweater for the waist shaping, I opted to do my decreases and increases along the sides instead, visible here: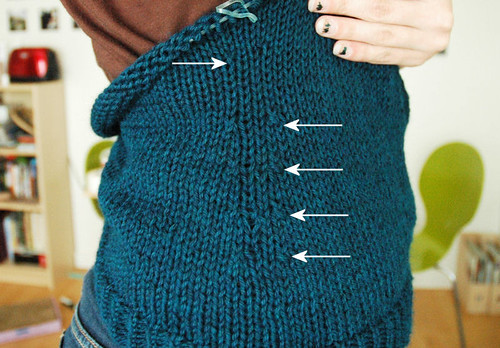
I had no trouble with the placement of the shaping - I spaced my decreases about an inch apart, gave about an inch and a half between the last decrease and the first increase, and went back to the one-inch spacing between each increase. I decreased four times and increased only two, knitting straight up to the underarm on the body. I wanted to keep it simple so I didn't do any short rows to dip the yoke or anything like that - the body stayed put until the sleeves were ready to be joined. The sleeves were also knit in the round, with fairly regular increases until they reached my upper arm. 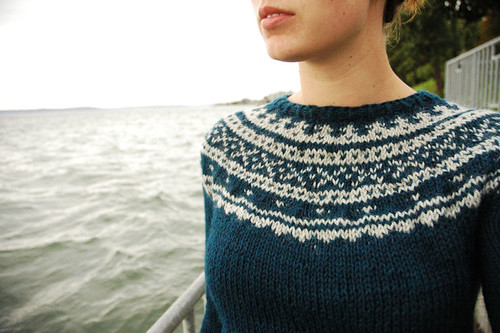
And then came the yoke! I had never knit a yoke with colorwork before, so I spent some time studying the stranded yoke charts of a few other sweaters to get an idea of where and how often to place the decreases. As far as I can tell, the key is to knit a round of one color before you work a decrease round, and when you decrease, you should use the same color as the round before. I worked up a chart for myself, borrowing motifs from both traditional Norwegian and Icelandic knitting.
Getting the bind off right took three tries as well - I kept binding off too tightly. Desperate to finish my sweater, I ended up trying Jeny's surprisingly stretchy bind off from knitty. It did the job (the sweater fit over my head) but it's not the prettiest bind off I've ever seen, so I'm in search of a cleaner-looking stretchy bind off for next time.
All in all, I'm extremely proud of Skydottir. There are a few things I would fix if I tried it again - I was aiming for a more fitted sweater than I ended up with, and the colorwork is a little wonky in places because the gauge requires a looser tension than I'm accustomed to - but the sweater is wearable, pretty, and just the sort of sweater I was hoping for. Yarn and needle details:
Main color: Berroco Vintage, worsted weight, colorway Tide Pool (5185)
Contrasting color: Berroco Ultra Alpaca, worsted weight, colorway Moonshadow (6209)
#9 needles (5.5mm), 24" and 32"
Oh, and the name Skydottir comes from my new favorite cookies, made in my favorite neighborhood in Seattle.
No comments:
Post a Comment